

The ways to enable the USB Debugging Mode of Android Phones are very similar, yet may vary slightly due to brand policy and the Android version. This collection of guides for enabling the debugging mode of Android phones covers phones of up to 16 mainstream brands and very early system versions. Click the brand buttons below to jump to the corresponding guide or slide down to the bottom to check the ones for earlier Android versions.
Brand Buttons for:


Please note that the pictures presented under each section of the guide are just for reference and the actual UI may vary depending on device models.
Guide for Enabling USB Debugging Mode (Sorted by Brands)
For Google, HUAWEI Honor Series/Mate/P Series, Motorola, ONEPLUS, SONY, and ZTE phones:
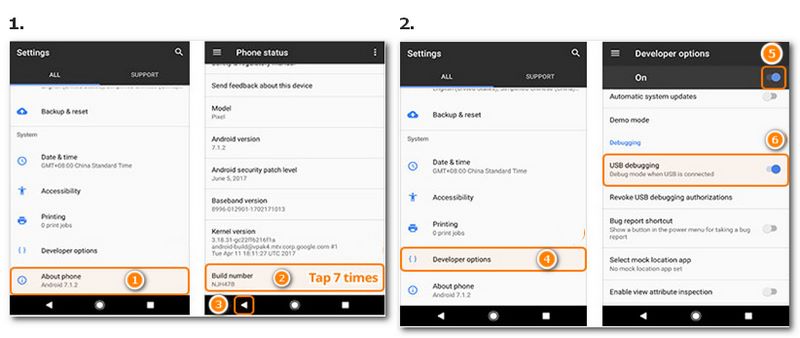
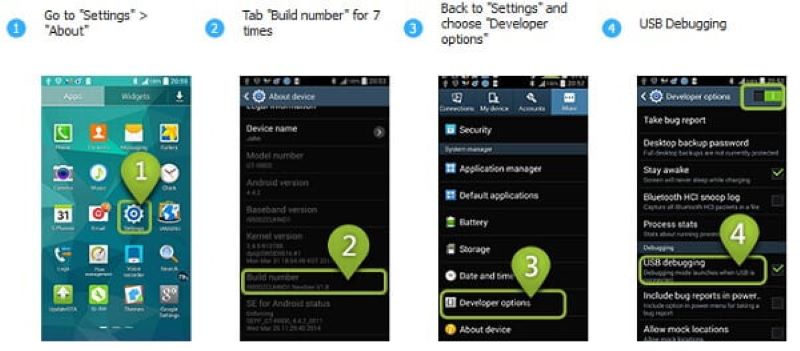
Step 1. Open Settings and select About phone.
Step 2. Tap Build number 7 times, and go back to Settings.
Step 3. Select Developer options.
Step 4. Turn on the developer options and slide on/tick USB debugging mode. If any confirmation for this request pops out, please choose OK or similar options to agree.
For ASUS, Lenovo, LG phones and Samsung Galaxy S5/S6/S7, Samsung Galaxy S8/S8+:
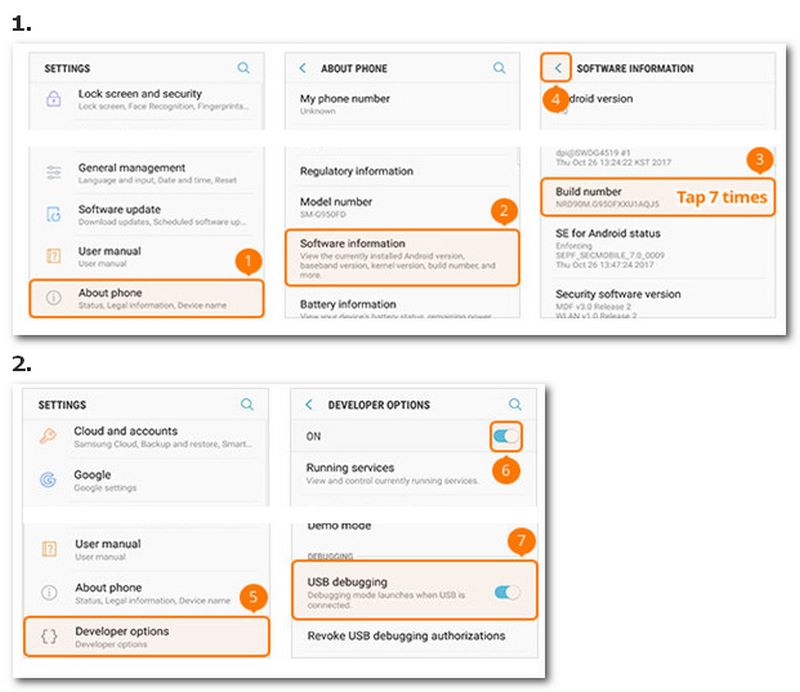
Step 1. Open Settings and select About phone, or options of a similar meaning, like About device or About.
Step 2. Choose Software information, or options of a similar meaning, like Device information or Software info.
Step 3. Tap Build number 7 times, and go back to Settings.
Step 4. Select Developer options.
Step 5. Turn on the developer options and slide on/tick USB debugging.
For HTC:
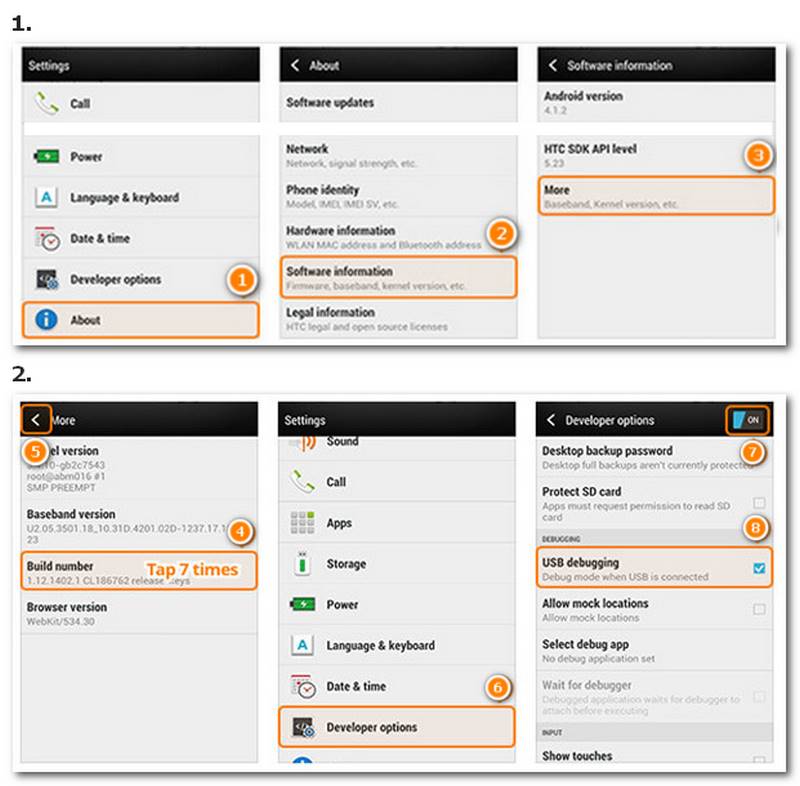
Step 1. Open Settings and select About.
Step 2. Choose Software information, then hit More.
Step 3. Tap Build number 7 times, and go back to Settings.
Step 4. Select Developer options.
Step 5. Turn on the developer options and slide on/tick USB debugging.
For Nokia:
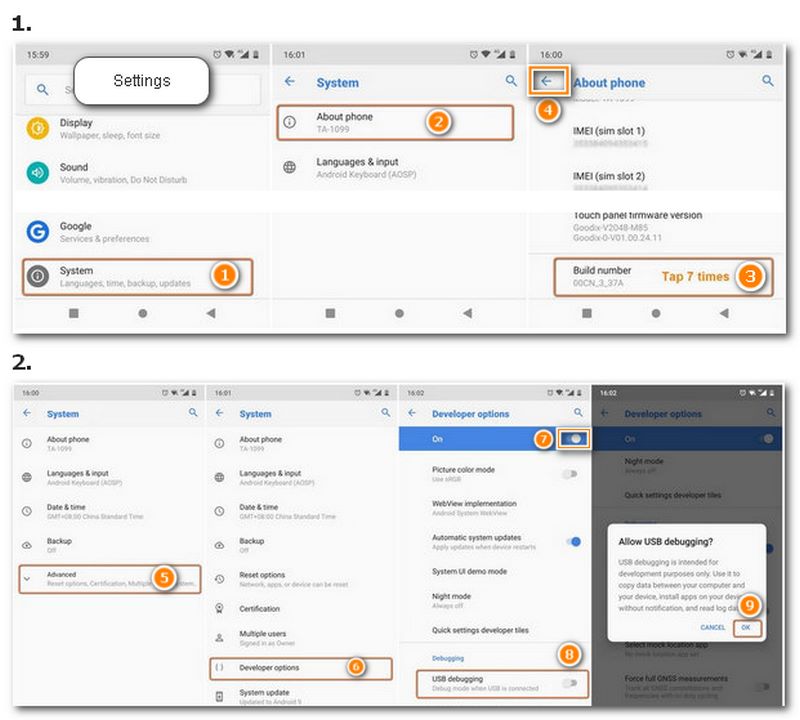
Step 1. Open Settings and select System.
Step 2. Select About Phone.
Step 3. Tap Build number 7 times, and go back to System.
Step 4. Select Developer options. It may be hidden in Advanced.
Step 5. Turn on the developer options and slide on/tick USB debugging. If any confirmation for this request pops out, please choose OK or similar options to agree.
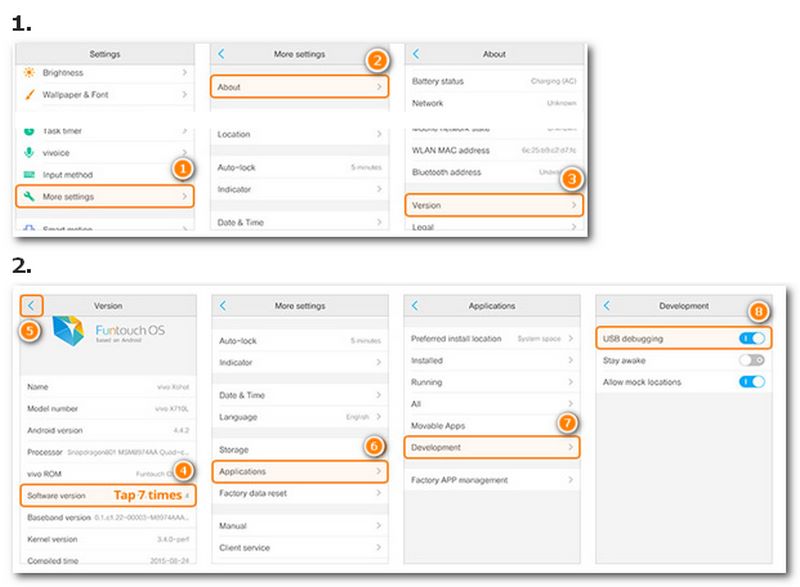
For VIVO:
Step 1. Open Settings and select More Settings.
Step 2. Select About, then hit Version.
Step 3. Tap Software version 7 times.
Step 4. Go back to More Settings and select Applications.
Step 5. Choose Developer options, then Development.
Step 6. Slide on USB debugging and Allow mock locations.
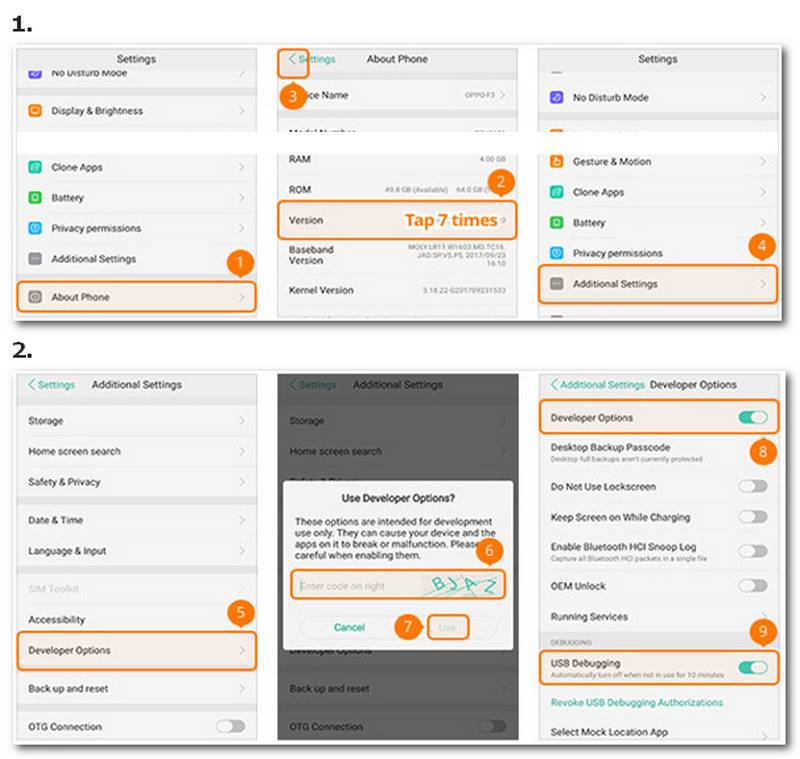
For OPPO:
Step1. Open Settings and select About phone.
Step 2. Tap Version 7 times, then go back button to Settings.
Step 3. Choose Additional Settings, then Developer options.
Step 4. Enter the Verification Code and hit Use.
Step 5. Slide on USB debugging.
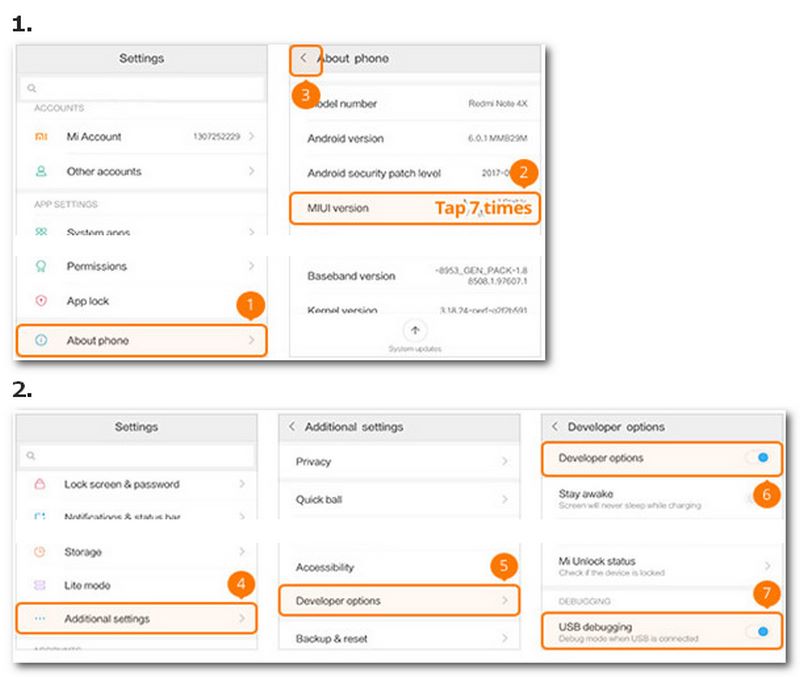
For Xiaomi (Redmi/Xiaomi):
Step 1. Open Settings and select About phone.
Step 2. Tap MIUI version 7 times, then go back to Settings.
Step 3. Select Developer options
Step 4. Turn on the developer options and slide USB debugging mode on. For some models, you may also need to slide on Install via USB.
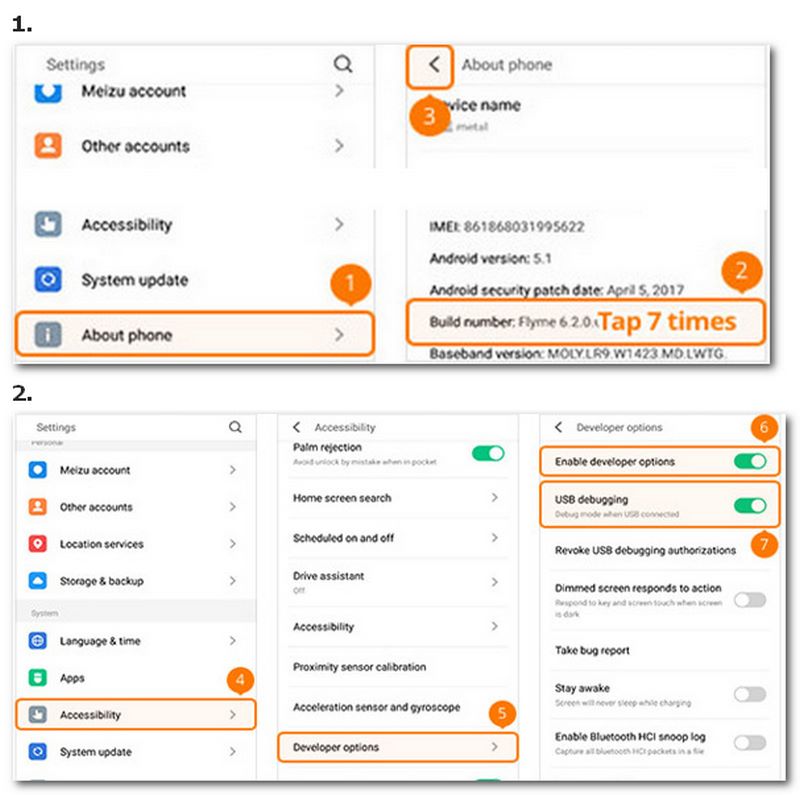
For MEIZU:
Step 1. Open Settings and select About phone.
Step 2. Tap Build number 7 times, and go back to Settings.
Step 3. Choose Accessibility, then Developer options.
Step 4. Slide on Enable developer options and USB debugging.
Guide for Enabling USB Debugging Mode (Earlier Android Version)
For phones installed Android 4.2 or later versions :
Possibly applicable models include Samsung Galaxy S10/A9 Star/S9+/S9/S8+/S8/S6 Edge/S6/S5, Samsung Galaxy Note 8/Note 5/Note Edge/Note 4/Note 3/Note 2, Samsung Galaxy Tab S/Pro, LG G8/G7/G6/G5/G4/3/2, HTC M10/9/8, Google Nexus 10/9/7/6/5/4, Google Galaxy Nexus/Nexus S, Xperia Z5/Z4/Z3/Z2/T3/M2/Z1, etc.
Step 1. Open Settings and select About phone.
Step 2. Tap Build number 7 times, and go back to Settings.
Step 3. Step 3. Select Developer options.
Step 4. Turn on the developer options and tick USB debugging mode.
For phones installed Android 3.0 — 4.1:
Possibly applicable models include HTC ONE M7, HTC EVO 4G LTE, etc.
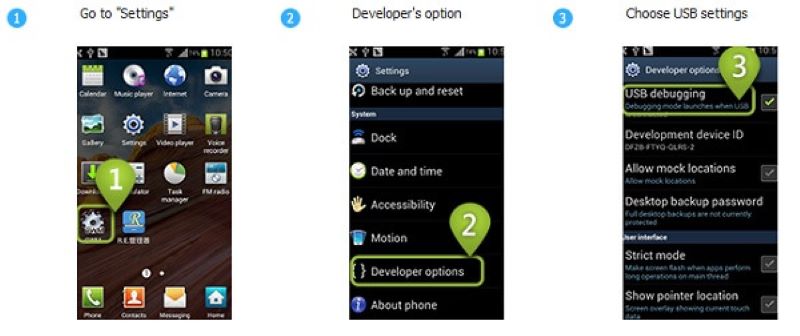
Step 1. Open Settings and select Developer options.
Step 2. Tick USB debugging on.
For phones installed Android 2.3 or earlier versions:
Possibly applicable models include Samsung Galaxy S2, Google Nexus One, etc.
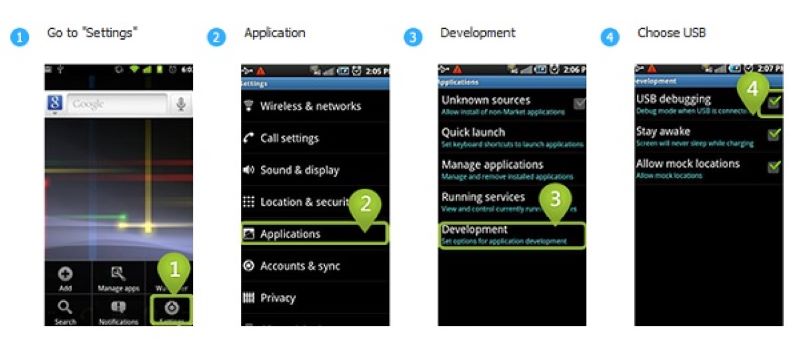
Step 1. Open Settings and select Applications.
Step 2. Choose Development.
Step 3. Tick USB debugging on.
Things You Should Know Before Enabling USB Debugging Mode
Turning on USB debugging Mode can give you the highest authority over your phone so that you can now visit all the data stored in your device, unlock software or the system freely, fix problems that can’t be fixed normally on your device through the computer, and root the Android with ease. However, under USB debugging mode, your phone is not protected from outside attacks. So there is a chance that some junkware may find its way to secretly install itself on your phone, or some of your personal information might be stolen. And if your phone gets connected to a computer by other people under USB debugging mode, they can get total control of the device as well. So remember to turn it off as soon as you finish using it to avoid potential loss.